Triggers
Page listing the triggers.
On the list screen, the trigger name, trigger type, when the trigger will be disabled (if any), and is it disabled? information can be displayed.
The functions of the buttons on the screen that opens when the "Actions" button on the list is clicked are as follows:
- Start Now: If the trigger needs to be run before its time, it can be run with this button.
- Edit: The screen where the information of the trigger can be changed.
- Disable: If the trigger is active, this button can be used to disable it.
- Enable: If the trigger is not active, this button can be used to reactivate it.
- Delete: This button can be used to delete the trigger.
How to Create a Trigger?
There are two ways to create a trigger:
- When the "Trigger Creation Screen" is opened by clicking the "Create Trigger" button on the process whose trigger is to be created in the Process List.
- When the "+" button in the trigger list is clicked, the "Trigger Creation Screen" is opened.
Trigger Creation Screen
Two types of triggers can be created.
Time-Based Trigger
To create timed jobs from the created process, a time-based trigger must be created. The time-based trigger will create a job from the relevant process when the execution time comes according to the specified information, and will give the job to the first available robot among the specified robots and ensure its operation.
Name: The name of the trigger to be created.
Process: The process that the trigger will run is selected here.
Robots: It is specified here which Robots can run the created trigger. When a Job is created from the trigger, it will be sent to the robots in the order specified here. Therefore, if there is a robot that is preferred first, it must be at the top.
Time Zone: It is specified here which time zone the trigger should be based on.
Execution Time Plan: There are 6 different options to proceed here:
- Minute: This field is used for triggers that need to run every 1, 5, 10, 15, 20, 30, 45 minutes. In the visual below, the trigger is set to run every 5 minutes.

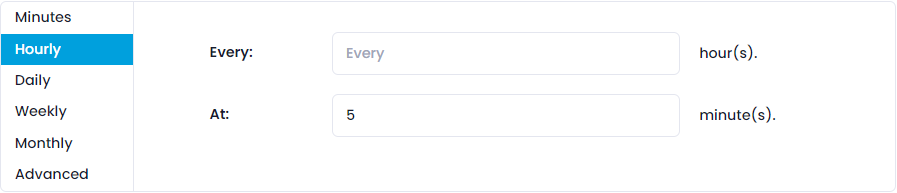
- Hourly: It is used to ensure that the trigger works within a certain time interval. In the visual below, the trigger is set to run every 1.5 hours.
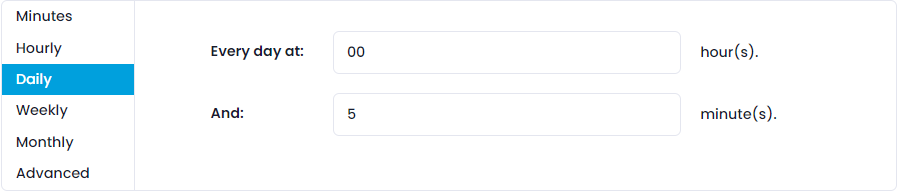
- Daily: It is used to ensure that the trigger works at a certain time every day. In the visual below, the trigger is set to run at 00:30 every day.
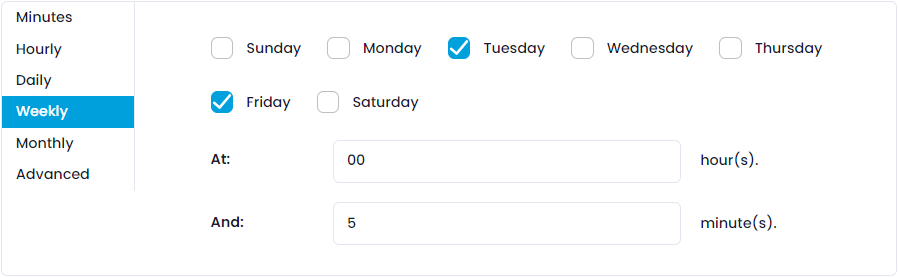
- Weekly: It is used to ensure that the trigger works at a certain time every week. In the visual below, the trigger is set to run on Mondays at 01:15 every week. Similarly, a few of the days of the week can be added. In this case, it will also work at 01:15 on those days.
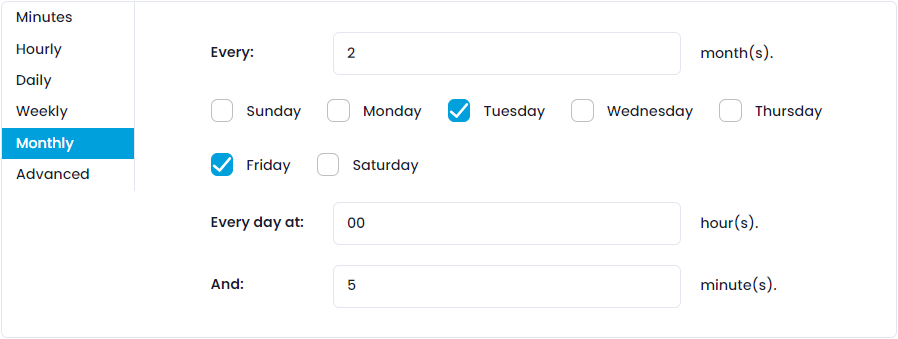
- Monthly: It is used to ensure that the trigger works at the specified time on the selected first days of the month every specified number of months. In the visual below, the trigger is set to work on Mondays and Wednesdays in the first week of every 2 months at 7:30.
- Advanced: If a suitable option cannot be found according to the desired criteria, a trigger can be created with the help of a "Cron Expression". In the visual below, the trigger is set to run every 55 minutes.

Off Days Restrictions: By selecting the created Off Days here, it can be ensured that the trigger does not work when it falls on that day. In the example below, if the created trigger falls on May 29th Republic Day, it will not create any jobs that day.
![]()
Disable the Trigger after this time: When the option is selected, the disablement date field will be opened below. When the disablement date entered arrives, the trigger will be automatically disabled and will not create a new one until it is reactivated.
Disablement Date: The date on which the trigger will be disabled. In the example below, the trigger to be created will be disabled on May 25, 2023, at 2:45 pm, and will not create a new one until it is reactivated.

Queue-Based Trigger
If a new job is to be created from another process by listening to a queue, a queue-based trigger should be used. Time cannot be specified in the queue-based trigger because the system will be triggered when a new element is added to the specified queue.
Name: The name of the trigger to be created.
Process: The process that the trigger will run is selected here.
Robots: It is specified here which Robots can run the created trigger. When a Job is created from the trigger, it will be sent to the robots in the order specified here. Therefore, if there is a robot that is preferred first, it must be at the top.
Time Zone: The time zone the trigger should be based on is specified here.
_Non-working days restrictions:_Created Non-Working Days can be selected so that the trigger does not work when it falls on that day. In the example below, if the trigger created falls on the 29th of May, Republic Day, it will not create any jobs on that day.
![]()
Queue: Used to specify which queue the trigger will listen for data to be added to run. As soon as any data is added to the queue specified here, the trigger will kick in and create a new job.
Disable trigger after: When the option is checked, the disable date field will appear under it. Once the entered deactivation date is reached, the trigger will be deactivated automatically and will not create a new job until reactivated.
Deactivation Date: The date on which the trigger will be deactivated. In the example below, the trigger that will be created will be deactivated at 14:45 on 25 May 2023 and will not create a new one unless activated again.
Trigger Edit Screen
The information entered in the trigger creation screen can be edited on this screen.