Java Access Bridge Management Interface
The Java Access Bridge Management Interface is a tool that allows you to manage Java Access Bridge settings. If Java Access Bridge was not enabled during the studio setup, you can enable it by following the steps below.
1. Accessing the Java Access Bridge Page
- Navigate to Tools => Other Tools => Java Access Bridge within the studio.
- The tools page is displayed in the image below:

2. Java Access Bridge Management Screen
- Click the Manage button to open an information dialog.
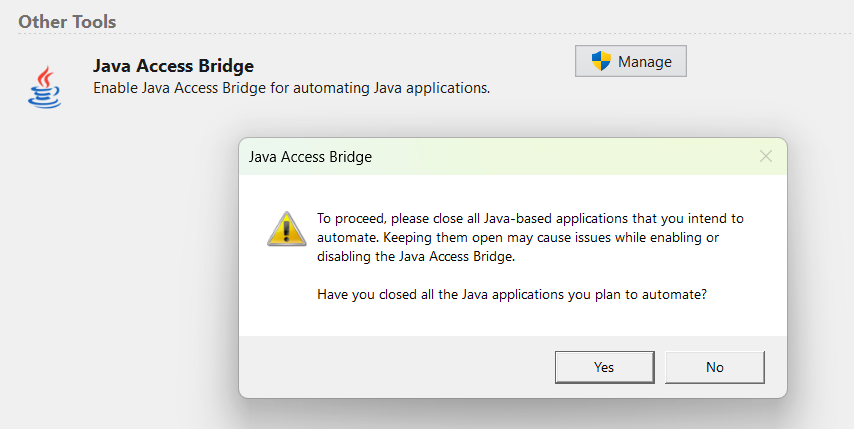
This dialog reminds users that all Java-based applications must be closed before enabling Java Access Bridge. If "No" is selected, the process is canceled, and the user is informed that all Java applications must be closed. If "Yes" is selected, the system checks for existing Java installations and starts the management process for each one.
3. Enabling or Disabling Java Access Bridge
For each Java installation, the following selection screen is displayed:
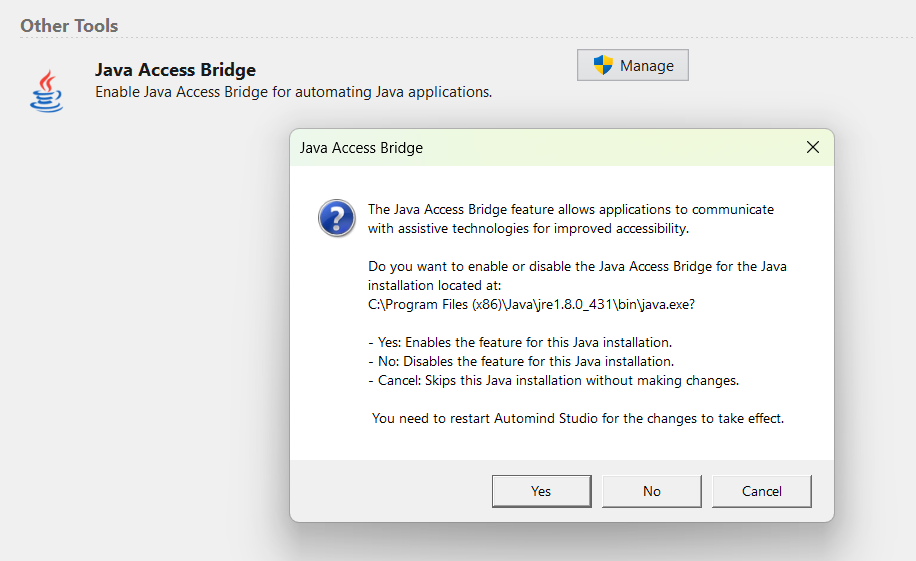
This screen provides the following options:
- Yes: Enables Java Access Bridge.
- No: Disables Java Access Bridge.
- Cancel: Skips this Java installation without making any changes.
Important: Changes will take effect after you restart Automind Studio.
4. If No Java Installation is Found
If the system cannot find jabswitch.exe, which is a part of Java Access Bridge, the Java Access Bridge management interface cannot be used. In this case, the following issues may be the cause:
Possible Causes:
- Missing or incomplete Java installation.
- The
bindirectory is missing or inaccessible. - Java is not added to the system PATH variable.
Solution Steps:
- Ensure that a valid JRE or JDK installation is present.
- Verify that
jabswitch.exeexists in thebindirectory. - If necessary, add Java to the system PATH variable.
- If the issue persists, reinstall Java.
Manually Enabling Java Access Bridge
If Java Access Bridge still does not work after following the above steps, you can enable it manually:
- Navigate to the JDK installation directory.
- Open the
bindirectory. - Open a terminal or command prompt in this directory.
- Run the following command:
jabswitch.exe /enable - Restart the studio and start automating Java applications.
Additional Note: 32-bit and 64-bit Java Installations
Some applications run on 32-bit Java, while others operate in a 64-bit Java environment. For maximum compatibility and a seamless Java automation experience, it is recommended to enable Java Access Bridge for all Java installations on your system. This ensures uninterrupted integration and accessibility for applications running on both platforms.
By following these steps, you can enable the Java Access Bridge feature and easily automate Java applications with Automind Studio.